Exercise 2 – creating and releasing an API for consumption
Deploying applications is one of the most frequent tasks that a DevOps engineer might encounter. It is important to have a good, fast deployment, but before that, it is important to have a deployment in the first place. Deploying smaller and larger applications are alike in a lot of ways. One major way in which they differ is the lengths you must go through to maintain availability on larger applications. We won’t be discussing that in this section. We will instead just try to get an API up for adding two numbers. Like I said, let’s keep it simple and begin creating a new Replit Repl and start coding in it.
- Sign up for an account at replit.com. You can create small virtual environments for practically every application framework and code base there. Once you have signed up, you can create a Repl, which is a small virtual server, by clicking the Create Repl button:

Figure 3.7 – Button to create a Repl
2. Once you have done that, search for and create a Repl with the Flask template. The name is not relevant:

Figure 3.8 – Initializing a Flask Repl
This will give you an IDE that contains boilerplate Flask code that is pre-initialized and installed with the basic Flask libraries:
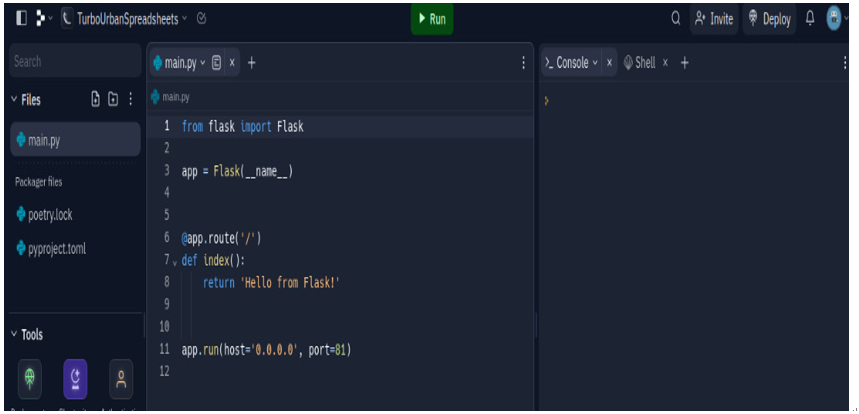
Figure 3.9 – Initial Flask framework
2. Concerning the preceding figure, when you click the Run button shown on top, you’ll launch a Flask server, a URL that will return some sort of answer when it is called. The server’s default route of “/” has already been defined. So, if you open the URL in a new tab, you’ll get something like this:

Figure 3.10 – Initial Flask web page
This function just returns a string on a webpage. Typically, APIs are written in a JSON format. So, let’s turn this into JSON. In Flask, that is pretty easy. You can just pass a variable that is a dictionary in the return type:
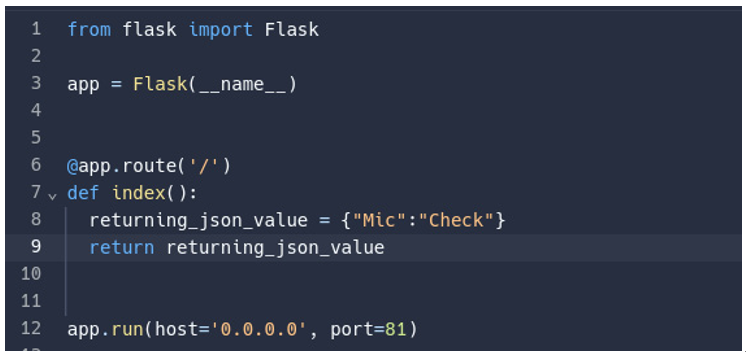
Figure 3.11 – Writing a simple JSON API in Flask
Once that’s done, you’ll get a return value in JSON:

Figure 3.12 – JSON API result
4. This API, as it is, only returns static values. To have it take user input, simply add request parameters in the URL itself. Let’s modify our application to take two parameters, num1 and num2, which will be added, and their sums shown in the JSON return value:
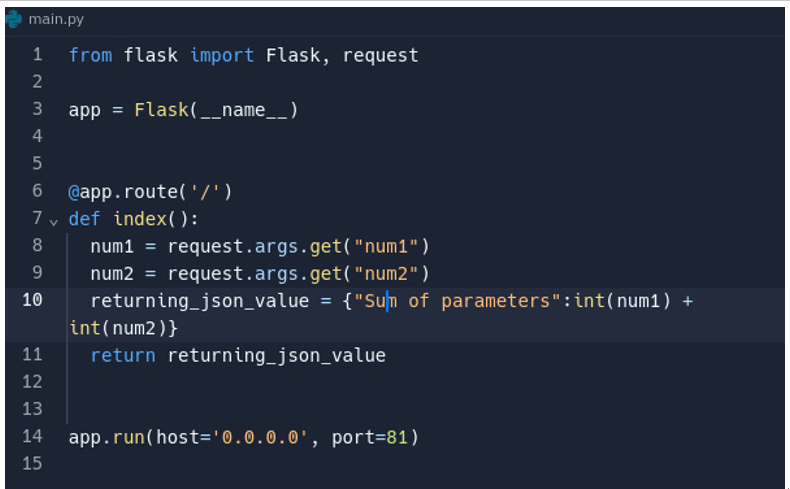
Figure 3.13 – Flask API code to add two numbers
The end result requires a URL in the form of <your_url_here>/?num1=<number>&num2=<number>. The result would look something like this:

Figure 3.14 – Flask API call to add two numbers
So, now you have learned how to make an API in Python that adds two numbers and deploys the API. That’s a really big step. The only thing that gets exponentially more complex in the programming world is business logic. Security and networking are important too, but they usually follow a set formula. As long as you can deploy your logic to your end user, you’re good.
Now, that you have learned the art of the API, we are going to dive into what delivers APIs to their end users. We are diving into networking. Networking is such an integral part of DevOps and application development in general that sometimes it’s not mentioned at all. So, let’s look at a few useful ways that we can use Python on the networking side.